
Key Takeaways
-
Use about 18 inches of floss and move to a fresh section for each space, since reusing the same stretch can spread plaque from tooth to tooth.
-
Never force the floss threader under the wire; use gentle wiggling motions and try waxed floss if it still won't slide through.
-
Curve floss in a 'C' shape around each tooth and slide it up and down, including just below the gumline, where plaque often builds up.
-
Carefully withdraw floss the same way it went in, rather than yanking it straight up, which can catch on brackets and disturb wires.
-
Pair flossing with brushing twice daily with fluoride toothpaste, since flossing alone leaves brackets and wires dirty.
-
Call your orthodontist if a wire or bracket feels loose or if flossing causes persistent pain or bleeding.
Let’s be honest: flossing with braces can feel like a puzzle. You stare at the wire, you stare at the floss, and you wonder how those two are supposed to get along. If you’ve ever given up halfway and just brushed instead, you’re not alone. Many patients feel the same way during their first weeks in braces.
The good news is that using a floss threader with braces is a simple skill once you know the steps. A floss threader is a small, flexible loop that guides regular floss under the archwire, so you can clean between your teeth. Even so, a few common slip-ups can make the job harder, messier, or less effective.
In this friendly guide, we’ll walk through nine mistakes people make with a floss threader and show you easy ways to fix each one. We’ll also cover the basic steps, other tools that can help, and when to call your orthodontist. Whether you’re a teen, a busy parent helping a child, or an adult starting treatment, you’ll find tips you can use tonight.

What Is a Floss Threader and Why Do Braces Need One?
With braces, a thin archwire runs across your teeth. That wire blocks regular floss from sliding down between your teeth the usual way. A floss threader solves this problem. It is a small, flexible loop, often made of plastic, that carries floss under the wire.
Flossing matters because a toothbrush can’t reach every space between teeth. The American Dental Association recommends cleaning between your teeth once daily with floss or another interdental cleaner. The American Association of Orthodontists (AAO) advises flossing at least once a day during treatment. Skipping this step can leave plaque near the gumline, where it may lead to swollen gums or white spots on teeth.
A threader is only one option, though. We’ll cover other tools later. First, let’s look at the basic steps so the mistakes make more sense.
How to Use a Floss Threader With Braces: Step by Step
Here is the simple routine most patients follow. Take your time. Speed comes with practice.
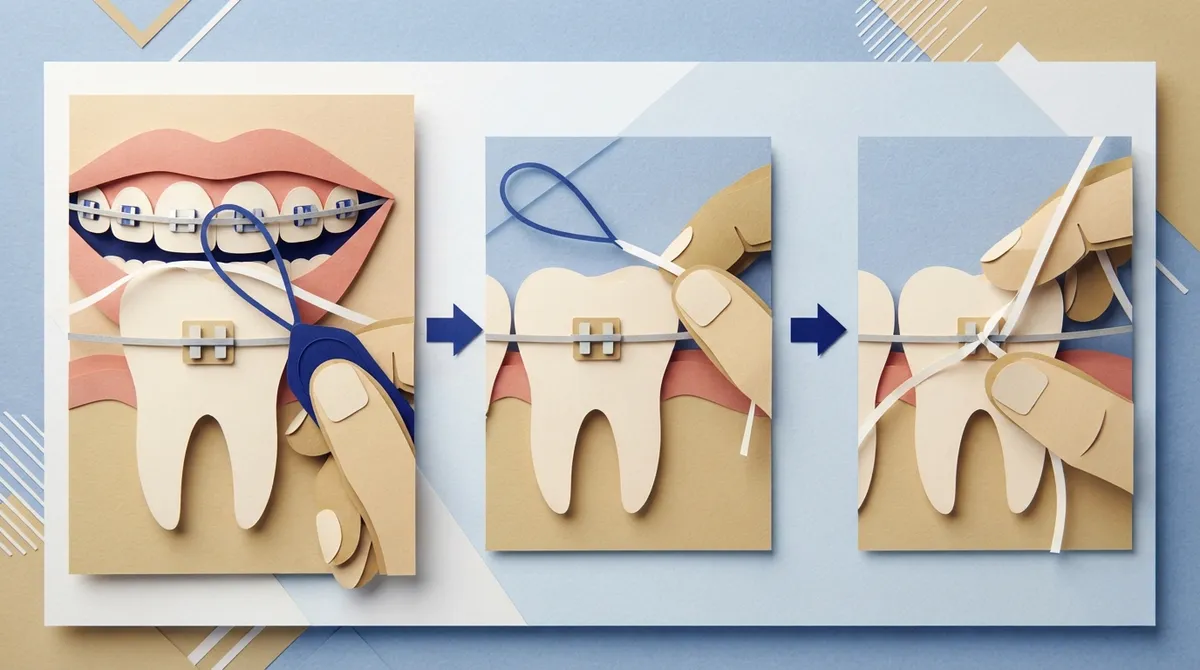
- Cut a piece of floss. Aim for about 18 inches, so you have a clean section for each space.
- Thread the floss through the loop. Pass one end of the floss through the threader’s loop, like threading a needle.
- Guide the threader under the archwire. Slide the stiff tip between two teeth and gently pull it under the wire.
- Pull the floss through. Draw the floss until it sits between the teeth, then let go of the threader.
- Clean both tooth sides. Hold the floss in a gentle “C” shape around one tooth. Slide it up and down along the side, including just below the gumline.
- Repeat on the neighboring tooth. Then carefully withdraw the floss. Don’t snap or pop it out.
- Move to a fresh section. Rethread and repeat for each space.
These steps follow the guidance from patient resources like the AAO. Your own orthodontist may give you extra tips based on your treatment, so always follow their instructions first.
Mistake 1: Using Too Little Floss
Short pieces of floss are tempting. They feel easier to handle. But when you reuse the same stretch of floss, you can spread plaque from one tooth to the next. That defeats the purpose.
The fix: Start with about 18 inches. Wind most of it around your fingers and use a fresh section as you move along. You can reuse the threader itself during a session, but move the floss to a clean section as you go.
Mistake 2: Forcing the Threader Under the Wire
If the threader isn’t sliding through, it’s natural to push harder. Please don’t. Forcing a threader can poke your gums or tug on the wire and brackets.
The fix: Use gentle, controlled movements. Angle the threader tip slightly and wiggle it under the wire. If it still won’t go through, try a different space or switch to a waxed floss that glides more easily. If the wire feels loose or sharp, call your orthodontist.
Mistake 3: Snapping Floss Against Your Gums
Snapping the floss down between teeth might feel quick, but it can bruise your gums. Braces already make gums a little tender, so rough flossing can lead to more soreness.
The fix: Ease the floss in with slow, steady motion. Slide it along the tooth side instead of forcing it straight down. Think of it like gently polishing a pearl, not sawing a loaf of bread.
Mistake 4: Yanking the Floss Out
After cleaning between teeth, many people pull the floss straight up and out. With braces, that can catch on a bracket or wire and even disturb the hardware.
The fix: Carefully withdraw the floss the same way it went in, sliding it back out under the wire. Take it slow. A calm exit protects both your braces and your gums.
Mistake 5: Choosing Floss That Shreds
Some unwaxed floss can fray and snag on brackets. Shredded bits left between teeth are annoying and may be hard to remove.
The fix: Many patients find waxed floss slides more easily and snags less. It’s a small change that can make your routine far less frustrating. Pick one you like, and keep a few extra packs in your bag and bathroom.
Mistake 6: Skipping Spaces When You’re Tired
We’ve all been there. It’s late, you’re sleepy, and you only floss the front teeth. But plaque loves the hidden spaces too.
The fix: Make flossing part of a set routine. The ADA says the timing of cleaning between teeth can fit your schedule, so pick a time you can stick with. Some people floss after dinner while watching a show. Others do it right before bed. Consistency beats perfection.
Mistake 7: Forgetting About the Gumline
Many people stop once the floss is between the teeth. But the sides of each tooth and the area just below the gumline are key spots for plaque.
The fix: Curve the floss around each tooth in a “C” shape and gently slide it up and down. Do this on both neighboring teeth before moving on. This extra step takes only a few seconds per tooth.
Mistake 8: Relying on Flossing Alone
A threader helps with the spaces between teeth, but it doesn’t clean the brackets and wires themselves. Plaque can build up around those areas, too.
The fix: Pair flossing with good brushing. The ADA recommends brushing twice daily with fluoride toothpaste. Angle your brush toward the gumline and clean above and below the brackets. For a full walkthrough, see our guide on how to brush teeth with braces. Together, brushing and flossing cover far more of your mouth.
Mistake 9: Ignoring Warning Signs
A little tenderness can happen when you’re new to flossing. But ongoing pain, heavy bleeding, or a loose wire isn’t something to brush off.
The fix: Contact your orthodontist if a wire or bracket becomes loose, or if flossing causes persistent pain or bleeding. It’s often an easy fix, and quick action prevents bigger problems. Our guide on emergency vs. routine orthodontics can help you decide when to call.
Quick Reference: Mistakes and Fixes
| Mistake | Why It Matters | Easy Fix |
|---|---|---|
| Too little floss | Spreads plaque between teeth | Use about 18 inches and move to clean sections |
| Forcing the threader | Can irritate gums or tug on wires | Use gentle, controlled movements |
| Snapping floss | Bruises tender gums | Ease floss in with slow, steady motion |
| Yanking floss out | May disturb brackets or wire | Carefully withdraw it the same way it went in |
| Shredding floss | Leaves bits stuck in braces | Try waxed floss |
| Skipping spaces | Plaque builds in hidden areas | Set a daily routine you can keep |
| Ignoring the gumline | Misses a key plaque spot | Curve floss in a “C” around each tooth |
| Flossing only | Brackets and wires stay dirty | Brush well around brackets, too |
| Ignoring warning signs | Small issues can grow | Call your orthodontist about pain or loose parts |
Other Tools That Can Make Flossing Easier
A floss threader works well, but it isn’t the only choice. If threading feels clumsy, you have options. Many patients mix and match tools depending on the day.
- Orthodontic flossers or floss with a stiff end: The stiff tip works like a built-in threader, which can simplify the process.
- Pre-threaded floss: The AAO lists this as another helpful aid for cleaning around braces.
- Interproximal brushes: These tiny brushes help clean around brackets and under wires.
- Water flossers: These can help remove debris. Ask your dental professional whether a water flosser should supplement or replace any part of your routine.
No single tool is perfect for everyone. If you’re unsure which mix suits you, ask us at your next visit. We’re always happy to demonstrate.
Should You Floss Before or After Brushing?
This question comes up a lot. The most important thing is that you do both every day. Some people like flossing first so the toothpaste can reach the freshly cleaned spaces. Others prefer brushing first. Choose the order that helps you stay consistent, and check with your orthodontist if they have a preference.
Tips for Different Family Members
For Parents Helping Kids and Teens
Younger children may need a hand with threading. Try making it a calm, no-rush routine. Stand beside them at the sink and guide them through each step at first. Praise their effort, even when it’s messy. As they grow more confident, you can step back. If your child is just starting out, our article on orthodontics for kids offers more parent-friendly advice.
For Teens and Young Adults
Busy schedules and social plans make flossing easy to skip. Keep a small pack of floss and a threader in your backpack or car. A quick cleanup after lunch can help you feel fresh before class or work.
For Adult Professionals
Between meetings and deadlines, oral care can slip. Try pairing flossing with a set habit, like your evening wind-down. If you’re curious about discreet options as well, see our guide on adult treatment.
For Health-Conscious Patients and Retreatment Patients
If you care about long-term gum and tooth health, careful flossing is a big part of that picture. It’s also smart to keep up with regular dental cleanings during treatment. Good habits now can help protect the results you’ve worked hard to achieve.
How Brockway Orthodontics Can Help
At Brockway Orthodontics, we love teaching patients how to care for their braces. Dr. Brockway and our team will show you how to use a floss threader at your appointment, so you’re never guessing at home. We want every patient to feel comfortable, informed, and confident about their care.
We offer metal braces, ceramic (clear) braces, and Spark™ Clear Aligners for kids, teens, and adults. Want to learn more about what to expect? Visit our page on all about braces. You can also see what families say about us on Google by choosing to visit us on Google — Brockway Orthodontics.
For more on cleaning habits, take a look at our tips on how to clean your braces properly. And for state-level guidance on finding qualified care, the Florida Association of Orthodontists is a helpful resource.
Final Thoughts: Small Habits, Big Smile
Using a floss threader with braces takes a little patience at first. Once you get the hang of it, it becomes just another part of your day. Avoid the nine mistakes above, keep your movements gentle, and pair flossing with good brushing. Your gums and your future smile will thank you.
Have questions about your own routine? We’d love to help. Book appointment online and our friendly Clearwater team will walk you through everything, step by step.
FAQs
Q: How do you use a floss threader with braces?
A: Pass a piece of floss through the threader’s loop, then gently guide the threader under the archwire between two teeth. Pull the floss through, clean along both tooth sides near the gumline, and carefully slide it back out. Repeat with a fresh section for each space.
Q: How often should you floss when you have braces?
A: The American Association of Orthodontists advises flossing at least once a day during treatment. Pick a time that fits your routine, like after dinner or before bed, so it becomes a habit you can keep. Your orthodontist may give you personal instructions too.
Q: Can a floss threader damage braces or loosen a wire?
A: Gentle use shouldn’t harm your braces, but forcing the threader or yanking floss out can disturb brackets or wires. Use slow, controlled movements and carefully withdraw the floss. If a wire or bracket feels loose, call your orthodontist.
Q: What should you do if your gums bleed while flossing with braces?
A: A little bleeding can happen when you’re new to flossing or your gums are irritated. Keep up gentle, consistent cleaning, but contact your orthodontist if bleeding or pain keeps happening. They can check your technique and your gum health.
Q: Are water flossers or orthodontic flossers as good as floss threaders?
A: Each tool has a role. Orthodontic flossers and pre-threaded floss can make threading easier, while water flossers help remove debris. Ask your dental professional whether a water flosser should supplement or replace any part of your routine.
Our Service Area